Safari获取UDID需要安装.mobileconfig文件,
但是,我们在安装了.mobileconfig后,返现配置描述文件打 开显示“unsigned” 或者“尚未签名”这样的情况,所以接下来的工作就是让我们的.mobileconfig文件看起来更加安全一些。
.mobileconfig签名网络上大多都是使用ssl证书进行签名(事实上,苹果官方ota也是用https证书进行签名的),ssl签名可以参考
http://www.rootmanager.com/iphone-ota-configuration/iphone-ota-setup-with-signed-mobileconfig.html
本文主要讲,使用苹果开发者证书进行签名达到目的
本文三种方法,一种是刀耕火种的一步步操作,一种使用脚本签名,一种是用系统自带命令签名。
推荐第三种方法!!!!!!!!
一.导出苹果证书进行签名
1.从钥匙串(keychain)中导出证书
实用工具->钥匙串访问->选择要导出的证书,导出生成p12文件 InnovCertificates.p12
然后转换成 InnovCertificates.pem 文件
2. p12换成pem格式方法
p12在线转换pem https://www.sslshopper.com/ssl-converter.html
(证书)cer.p12文件 转cer.pem文件
openssl pkcs12 -clcerts -nokeys -out cer.pem -in cer.p12(私钥)key.p12文件转key.pem文件
openssl pkcs12 -nocerts -out key.pem -inkey.p123.下载 Apple Root Certificate 和 Apple Intermediate Certificate
(对于本篇文章 .mobileconfig文件的验证我使用了苹果的以下两个证书.
Apple Root Certificate(苹果根证书)
Apple Application Integration Certificate (苹果应用集成证书 )
你也可以使用这些证书或者苹果提供的其他证书 地址: http://www.apple.com/certificateauthority/
下载的文件中包括证书(cer)和私钥(key)
(在命令行中读取证书,参考链接 info.ssl.com/article.aspx?id=12149)
根据这个文件我们可以解压出来证书.
在文本编辑器中打开两个解压出来的文件
复制并且粘贴Intermediate.crt.pem 到 root.crt.pem的开始位置,保存,然后你的root.crt.pem文件就是两个证书合并的结果
解压 Apple Root Certificate证书. 然后解压Apple Intermediate Certificate
openssl x509 -inform DER -outform PEM -in AppleIncRootCertificate.cer -out root.crt.pem
openssl x509 -inform DER -outform PEM -in AppleAAICA.cer -out Intermediate.crt.pem
4.签名和验证.mobileconfig文件
上边所有文件准备号后,运行命令行工具,运行以下命令:
openssl smime -sign -in Example.mobileconfig -out SignedVerifyExample.mobileconfig -signer InnovCertificates.pem -certfile root.crt.pem -outform der -nodetach结果就是签名并且验证后的 .mobileconfig文件
二.脚本签名
借助于强大的github,找到了一个python脚本进行签名
地址:https://github.com/nmcspadden/ProfileSigner
1.签名一个mobileconfig
profile_signer.py与 mobileconfig放在同一目录,终端进入目录执行:
./profile_signer.py -n "3rd Party Mac Developer Application" sign AcrobatPro.mobileconfig AcrobatProSigned.mobileconfig2.加密一个mobileconfig
./profile_signer.py -n "3rd Party Mac Developer Application" encrypt AcrobatPro.mobileconfig AcrobatProEnc.mobileconfig3.签名并且加密一个mobileconfig
./profile_signer.py -n "3rd Party Mac Developer Application" both AcrobatPro.mobileconfig AcrobatProBoth.mobileconfig"3rd Party Mac Developer Application"为你的证书在钥匙串中的全名,选择证书=>显示简介=>复制常用名称加上引号即可,比如
"iPhone Developer: jakey.shao [email protected]"
"iPhone Distribution: Skyfox Network Technology Co., Ltd."
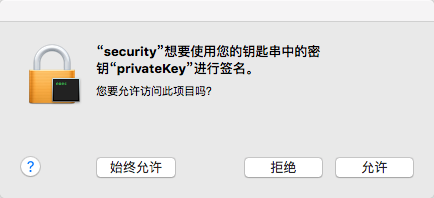
如果能正确读取到证书,会提示如上图所示,点击允许即可!
三.系统自带命令签名
在终端命令行中输入以下命令,查看可以用的证书。
注意:证书一定在钥匙串中是信任的。
/usr/bin/security find-identity -p codesigning -v签名描述文件
/usr/bin/security cms -S -N "iPhone Distribution: Skyfox Network Technology Co., Ltd." -i /Users/jakey/Desktop/udid_unsigned.mobileconfig -o /Users/jakey/Desktop/udid_signed.mobileconfig四.Ruby脚本ssl证书签名
笔者根据官方demo,把profile自动生成或读取 并ssl证书签名逻辑单独拿了出来。
https://github.com/shaojiankui/ProfileSigner-Ruby
五.Safari安装
用以上任意一种方法签名后,安装描述文件发现未签名变成了已签名,红色变成了绿色啦.安装的时候没有警告啦...茉莉花香啊!!!
传送门 通过Safari浏览器获取iOS设备UDID(设备唯一标识符)
参考文章&英文原文: